
Qubes OS for Anarchists
 Published on
| Last edited on
Published on
| Last edited on

Qubes OS is a security-oriented operating system (OS), which means it is an operating system designed from the ground up to be more difficult to hack. This is achieved through compartmentalization, where the base system is divided into compartments called "qubes". All other Linux systems like Tails are monolithic, which means that they are not compartmentalized, so if a hack succeeds anywhere on the system, it can more easily take over. In Qubes OS, if one qube is compromised, the others remain safe. You can think of using Qubes OS as having many different computers on your desk, each for a different activity, but with the convenience of a single physical machine and a set of tools for securely using them all together as a unified system.
Qubes OS can be configured to force all Internet connections through the Tor network (like Tails) by using Whonix, which is included by default. Devices (USBs, network devices, microphone and camera) are all strongly isolated and only allowed access when explicitly granted. "Disposables" are one-off qubes that self-destruct when shut down.
Who is Qubes OS For?
Given that anarchists are regularly targeted with malware in repressive investigations, Qubes OS is an excellent choice for us. We recommend Qubes OS for everyday use, and below we compare when it is appropriate to use Tails vs. Qubes OS in more detail — both have unique strengths. While Tails is so easy to use that you don't even need to know anything about Linux, Qubes OS is a bit more involved, but still designed to be accessible to users with limited technical know-how, like journalists. This guide is labelled as "intermediate", though if you need to extensively customize your set up or troubleshoot something, it is more likely to be "advanced".
Even if you don't do anything directly incriminating on the computer you use every day, if it were compromised, this would still give investigators a field day for network mapping — knowing who you talk to and what you talk to them about, what projects you are involved in, what websites you read, etc. Most anarchists use everyday computers for some anarchist projects and to communicate with other comrades, so making our personal computers difficult to hack is an important baseline for all anarchists. That said, the time investment to learn Qubes OS isn't for everyone. For those with limited energy to put towards increased anonymity and security, Tails is much more straightforward.
How Does Qubes OS Work?
Qubes OS is not quite another version of Linux. Rather, it is based on many "virtual machines" running Linux. All of these "virtual machines" are configured to work together to form a cohesive operating system.
What is a virtual machine? Virtualization is the process of running a virtual computer inside your computer. The virtual machine thinks it's a computer running on real hardware, but it's actually running on abstracted hardware (software that mimics hardware). Qubes OS uses a special program called a hypervisor to manage and run many of these virtual machines simultaneously, on the same physical computer. To simplify things, virtual machines are referred to as qubes. Different operating systems such as Debian, Whonix, Fedora, Windows, etc. can all run together at the same time in their own qubes. The hypervisor strongly isolates each of the qubes from one another.
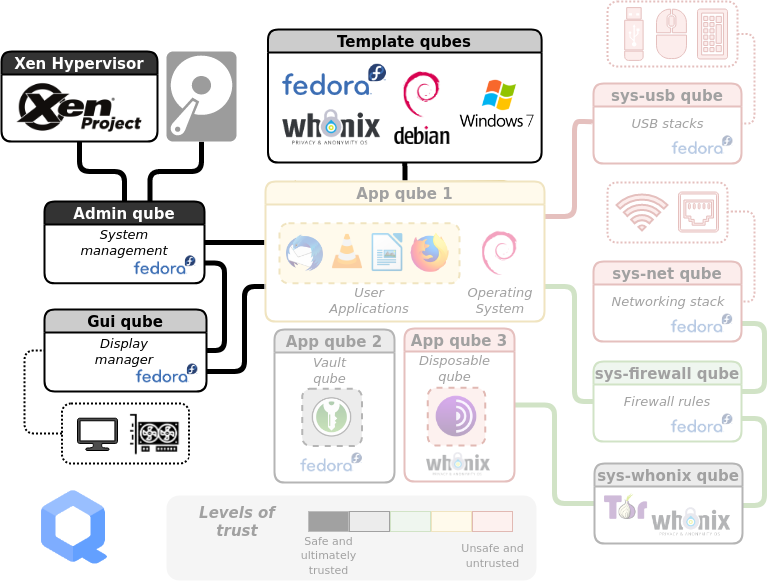
At the risk of overwhelming you, here is an overview of how Qubes OS is structured. You don't need to memorize any of this to actually use Qubes OS, but it may be helpful to understand the outline of the system before you get started. Each rectangle represents a qube (i.e. a virtual machine). Let's break it down.
General Usage
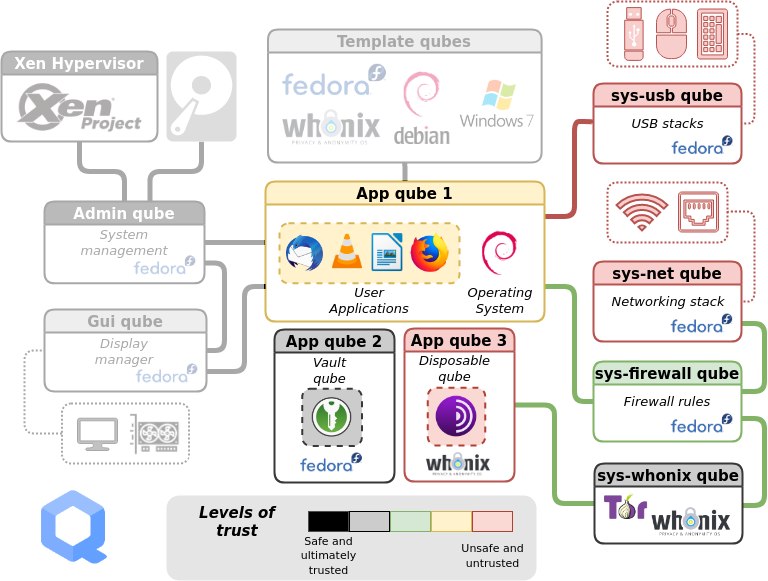
Ignore the greyed-out parts of the diagram for now. Daily use of Qubes OS primarily involves interaction with two components:
-
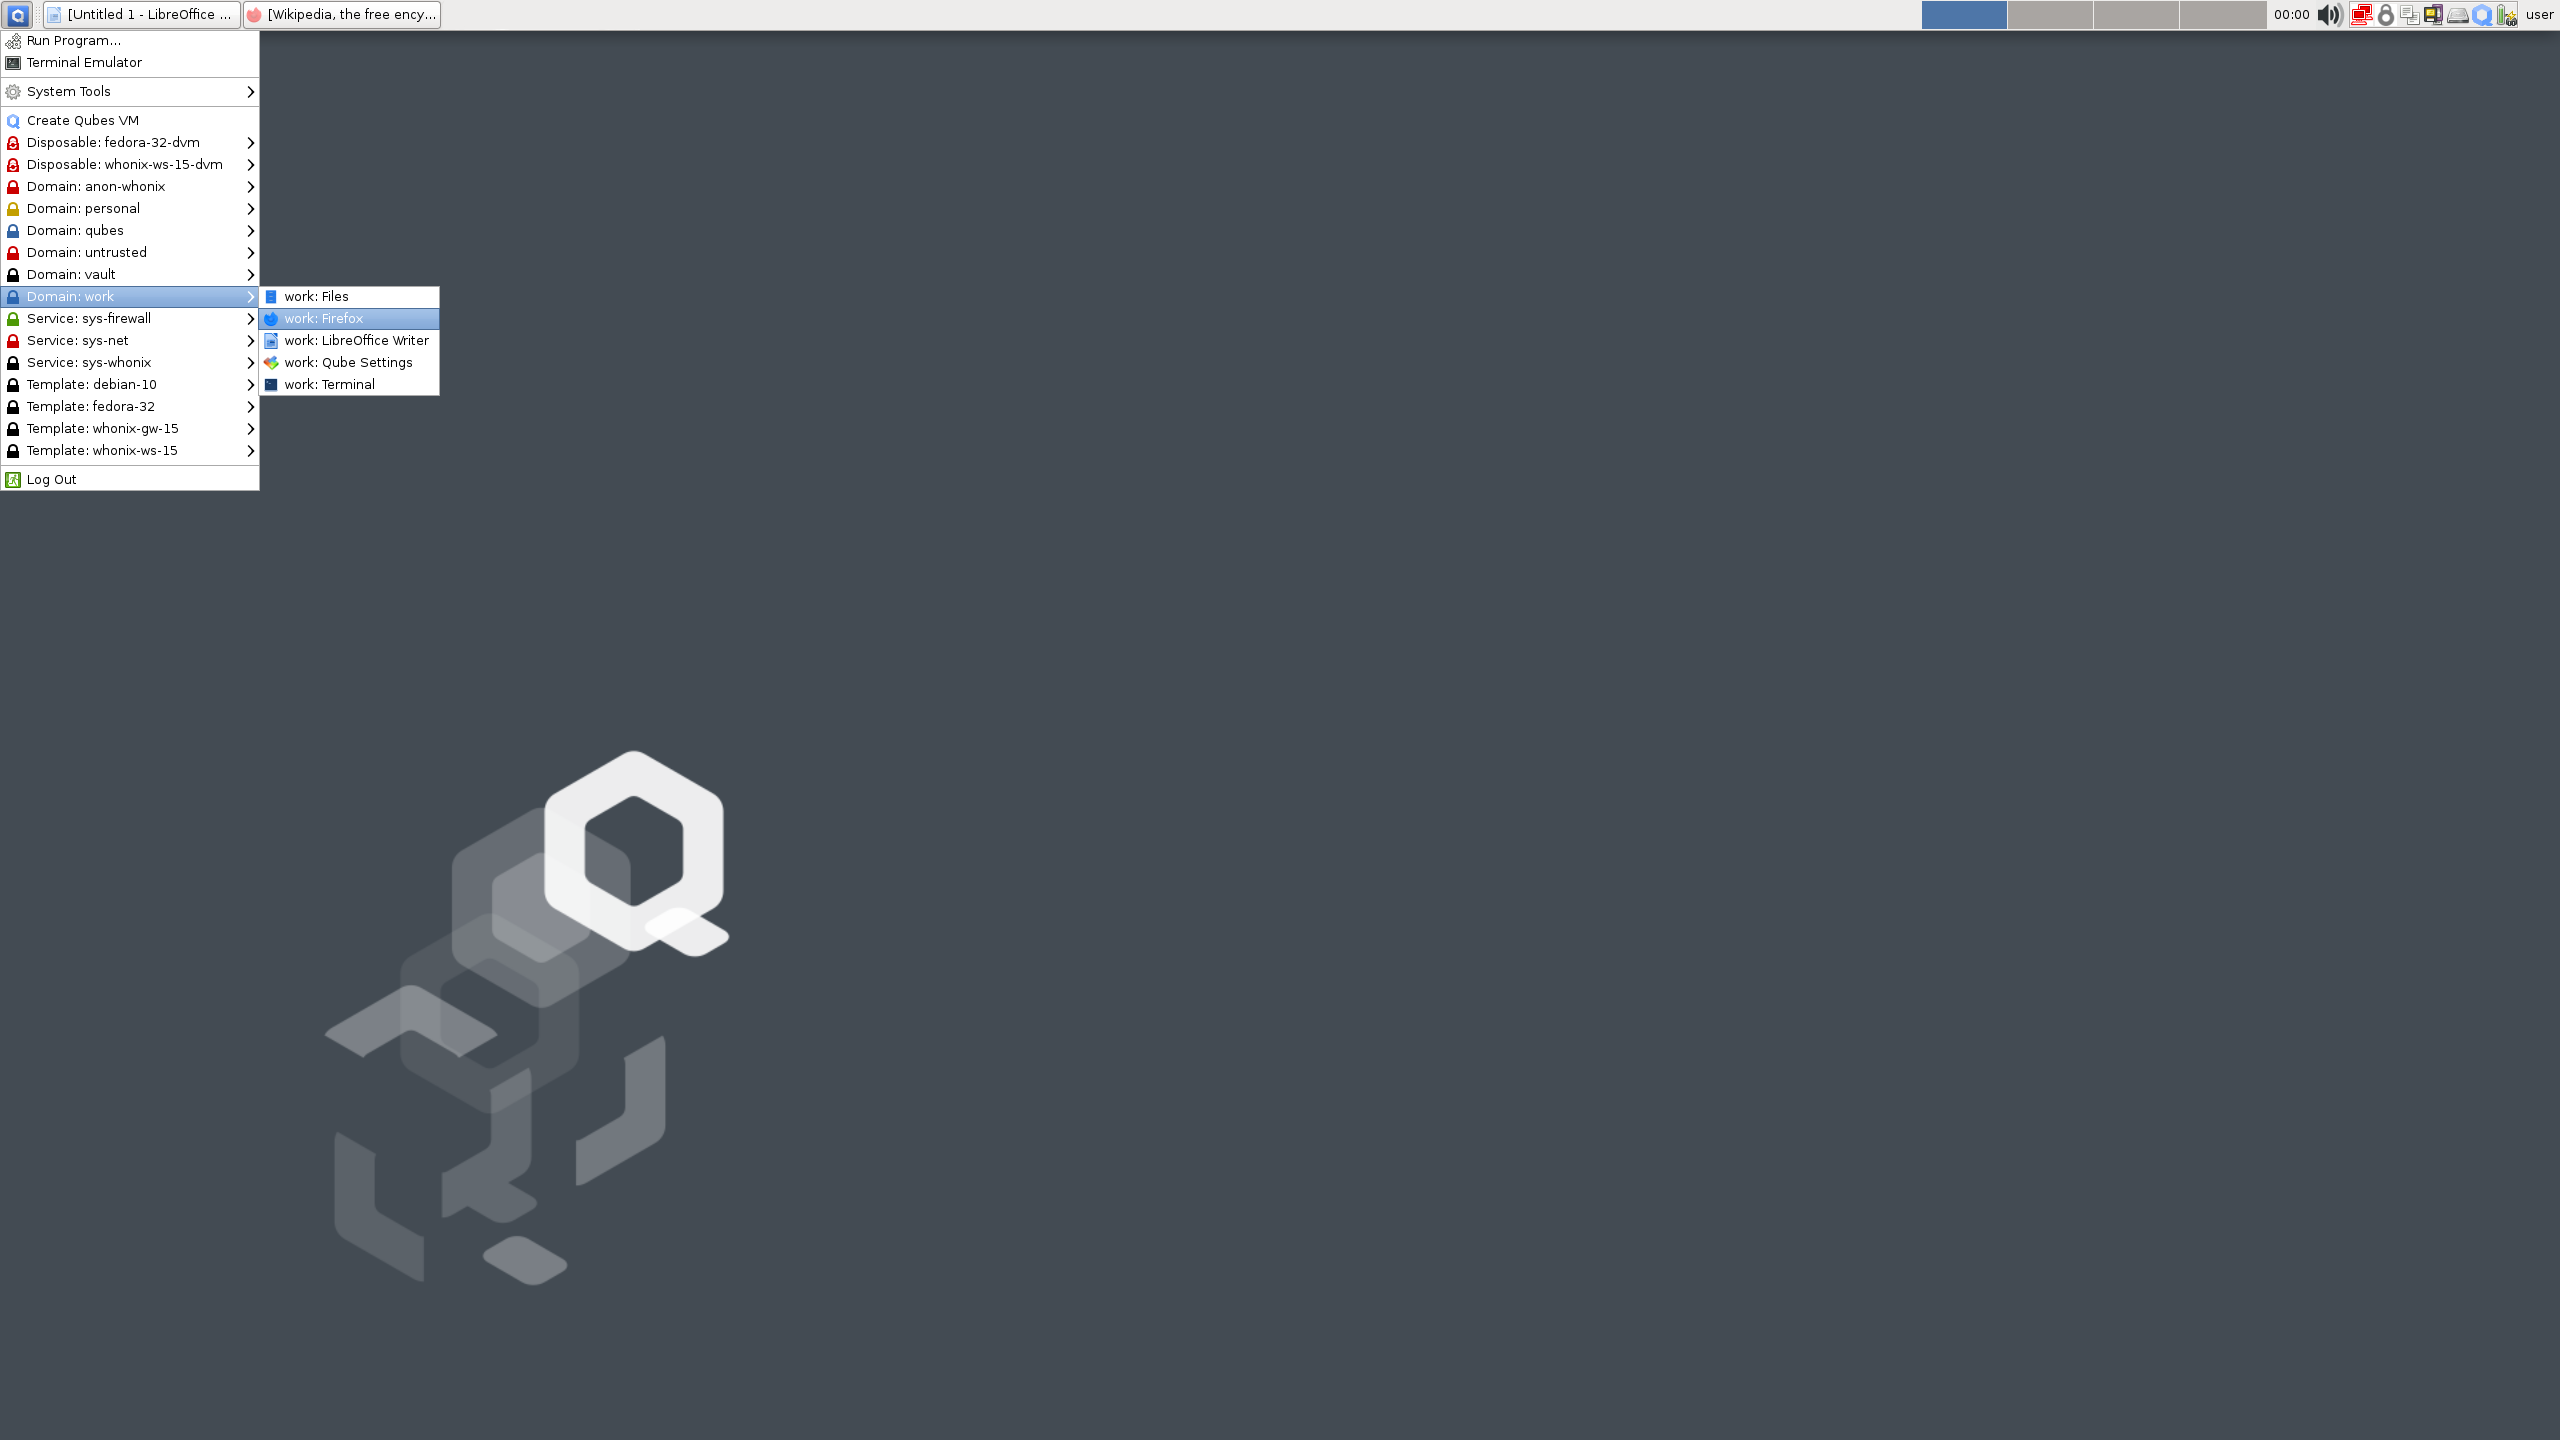
App qubes. In this example, there are three. #1 is running the Debian operating system, #2 is running Fedora, and #3 is running Whonix. App qubes are where you run applications, store files, and do your work. You can have many isolated App qubes for different activities or purposes. Each App qube is like a complete, self-contained operating system.
-
Service qubes. Sys qubes (as in system) connect to the Internet and to devices. sys-usb manages connected USB devices so that they are only able to attach to a qube if you give them permission. sys-net is similar to sys-usb, but for network devices. sys-firewall is firewall control for all Internet-connected qubes, and is in a separate qube so that if sys-net is compromised, the firewall isn't. Note that qubes never connect directly to sys-net, they always connect via sys-firewall. sys-whonix forces all network traffic through Tor, and connects to the firewall itself.
You'll notice that App qube #1 is connected to the Internet, App qube #2 is offline, while App qube #3 is connected to the Internet via Tor and is Disposable. Note that Whonix is actually split between two qubes: the workstation (App qube #3) and the gateway (sys-whonix). This has the security property that if the workstation qube is compromised, the gateway qube (where Tor runs) is not.
A Disposable qube is a type of App qube that self-destructs when its originating window closes. Note that while Tails uses only memory (when the Persistent Storage feature is not enabled), Qubes OS uses the hard drive, so a Disposable qube will leave forensic traces on your computer. A Disposable isn't intended to be anti-forensic, it's intended to reset a qube in case it is compromised by malware.
Management Qubes
Two more components are needed to complete the Qubes OS system:
-
Admin qube. This is the small, isolated and trusted qube that manages the other qubes. It's very protected because if it's compromised, it's game over. It uses a technology called Xen as the hypervisor. It is also called dom0, which is a Xen naming convention. The Admin qube has no network connectivity and is only used to run the desktop environment and window manager.
-
Template qubes. These are where applications and operating system files live and where you install and update software. Each App qube is based on a Template qube, and the App qube can only read from the Template, not write to it. This means that the more sensitive system files are protected from whatever happens in an App qube — they are not retained between App qube restarts. Multiple App qubes can be based on a single Template, which has the convenient feature that updating one Template will update all App qubes based on that Template.
Another security feature of the Qubes OS structure is that the App qubes don't have direct access to the hardware — only the Admin qube can directly access the hard drive and only the Service qubes can directly access the networking, USB, microphone and camera hardware. This means that it's more difficult to compromise the hardware from a compromised App qube.
When to Use Tails vs. Qubes OS
Put simply, Tails is easier to use and better protects against forensics, while Qubes OS better protects against malware.
Qubes OS includes Whonix by default, which forces all connections through Tor. As compared by Privacy Guides (emphasis added):
Whonix is meant to run as two virtual machines: a “Workstation” and a Tor “Gateway.” All communications from the Workstation must go through the Tor gateway. This means that even if the Workstation is compromised by malware of some kind, the true IP address remains hidden.
Tails is great for counter forensics due to amnesia (meaning nothing is written to the disk); however, it is not a hardened distribution like Whonix. It lacks many anonymity and security features that Whonix has and gets updated much less often (only once every six weeks). A Tails system that is compromised by malware may potentially bypass the transparent proxy allowing for the user to be deanonymized.
Whonix virtual machines may be more leak-proof, however they are not amnesic, meaning data may be recovered from your storage device. By design, Tails is meant to completely reset itself after each reboot. Encrypted persistent storage can be configured to store some data between reboots.
For more information on how Whonix compares to Tails in regards to different types of deanonymization attacks, see the Whonix documentation.
In order to recover data from a Qubes OS system when it is turned off, an adversary would still need to successfully bypass the Full Disk Encryption (e.g. by cracking a weak password). In order to recover data from a Tails system when it is turned off, the situation is the same if any data is saved to Persistent Storage or an encrypted USB — this saved data is no longer protected by anti-forensic features but by Full Disk Encryption.
Keep in mind that with Tails it is easy to destroy an encrypted USB you no longer need in order to revert to a blank slate of "no trace", but the equivalent with Qubes OS requires destroying the hard drive.
Our recommendation is to use Tails:
- For writing and submitting communiques
- For action research
- For provisioning and connecting to hacking infrastructure
- For anything else where traces will land you in prison
- If the learning curve for Qubes OS is too steep
And to use Qubes OS:
- As an everyday computer
- For sanitizing untrusted files
- For tasks or workflows where Tails is too restrictive
- For increased security against malware in a project, if you will be storing sensitive project data long-term on an encrypted volume anyways, because this long-term storage negates the anti-forensic property of Tails. For example, a project's private PGP key needs to be stored long-term, so the benefit of using Tails is negated but the benefit of using Qubes OS remains (increased security against malware).
Getting Started
Qubes OS works best on a laptop with a solid state drive (SSD, which is faster than a hard disk drive, or HDD) and 16GB of RAM. Check this hardware compatibility list to see if a specific laptop model will work. If you want to install HEADS open-source firmware it has limited compatibility, so keep that in mind when buying your laptop. We recommend the ThinkPad X230 because it's the only developer-tested laptop model and it is easily found in refurbished computer stores for around $200 USD. See the list of community-recommended computers for some other options, and the appendix for further discussion of hardware security.
The installation guide will get you started. The verification step requires using the command line. If this is over your head, ask a friend to walk you through it. Alternatively, learn the basics of the command line with Linux Essentials and see the explanation of a similar verification for Tails.
Do not set up "dual boot" — another operating system could be used to compromise Qubes OS.
After you first boot Qubes OS, there is a post-installation:
-
Check the boxes for Whonix qubes, and for updates to happen over Tor.
-
The post-installation gives the you option to install only Debian or only Fedora Templates (instead of both), and to use the Debian Template for all sys qubes (the default is Fedora). Whether you choose to use Debian or Fedora for qubes that don't require Tor is up to you, but this guide assumes you choose Debian. The Privacy Guides project argues that the Fedora software model (semi-rolling release) is more secure than the Debian software model (frozen), but also recommends Kicksecure (which is based on Debian). See the appendix for further discussion of this configuration choice.
-
Make sys-net disposable. If you are using Wi-Fi instead of Ethernet, you will need to re-enter the Wi-Fi password after every boot (you can simply paste it from your password manager).
The Getting Started document is a good overview of most of what you need to know to begin — stop here to read it! The Qubes documentation is very thorough, but can be difficult for a new user to navigate. We'll go over some basics here that aren't already covered on the Getting Started page.
How to Update
On Qubes OS, you should not use the apt update or apt upgrade commands, which you may be used to from other Linux experiences. As the documentation states, "these bypass built-in Qubes OS update security measures. Instead, we strongly recommend using the Qubes Update tool or its command-line equivalents." The first thing you'll want to do after connecting to the Internet in a new Qubes installation is to run Qubes Update. From the docs:
you can [...] start the tool manually by selecting it in the Applications Menu under “Qubes Tools.” Even if no updates have been detected, you can use this tool to check for updates manually at any time by selecting “Enable updates for qubes without known available updates,” then selecting all desired items from the list and clicking “Next.”
Make sure to have the computer plugged into power whenever you run Qubes Update. Updates take a moment to be detected on a new system, so select "Enable updates...", check the boxes for all qubes, and press Next. A Whonix window may pop up asking you to do a command line update, but ignore this since the update will resolve it. Once Qubes Update is complete, reboot.
How to Copy and Paste Text
Qubes has a special global clipboard that allows you to copy and paste text between qubes.
- Press Ctrl+C to copy text as normal to the internal clipboard of the source App qube.
- Press Ctrl+Shift+C to copy the contents of the internal clipboard of the source App qube to the global clipboard.
- Press Ctrl+Shift+V in the destination App qube to copy the contents of the global clipboard to the internal clipboard of the destination App qube.
- Press Ctrl+V to paste text as usual from the internal clipboard of the destination App qube.
It's a bit tricky at first, but you'll get the hang of it in no time!
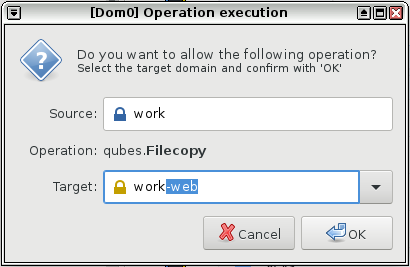
How to Copy and Move Files
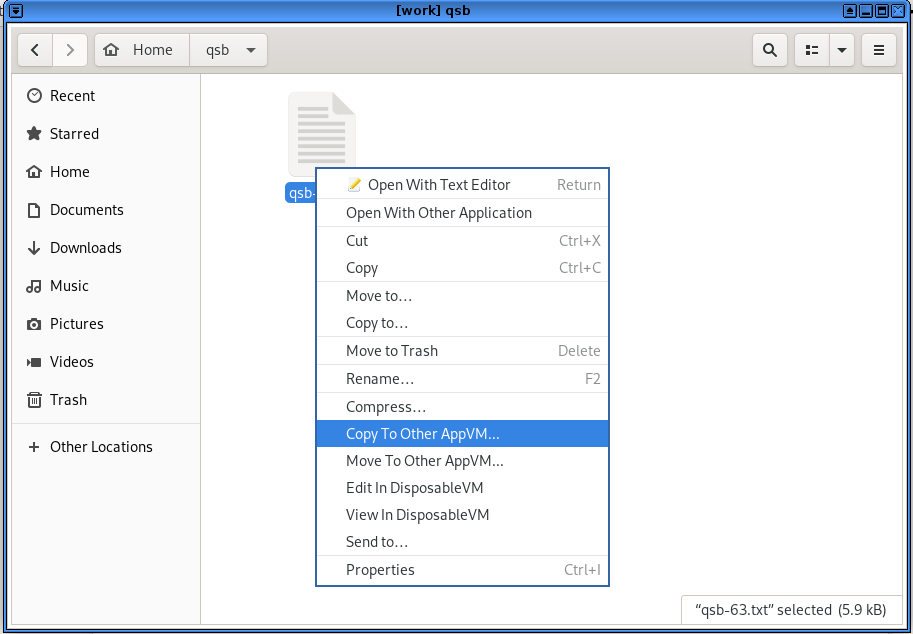
There is a special tool for moving files and directories (folders) between qubes that requires explicit user permission.
From the docs:
Open a file manager in the qube containing the file you wish to copy (the source qube), right-click on the file you wish to copy or move, and select Copy to Other AppVM... or Move to Other AppVM....
A dialog box will appear in dom0 asking for the name of the target qube (qube B). Enter or select the desired destination qube name.
If the target qube is not already running, it will be started automatically, and the file will be copied there. It will show up in this directory (which will automatically be created if it does not already exist):
/home/user/QubesIncoming/<source_qube>/. If you selected Move rather than Copy, the original file in the source qube will be deleted. (Moving a file is equivalent to copying the file, then deleting the original.)If you wish, you may now move the file in the target qube to a different directory and delete the
/home/user/QubesIncoming/directory when no longer needed.
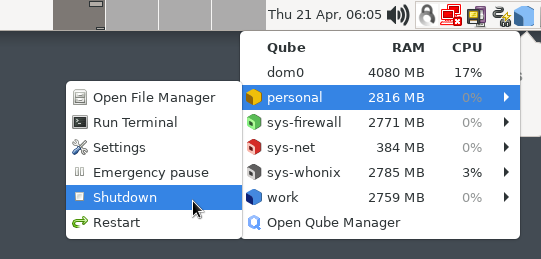
How to Shutdown Qubes
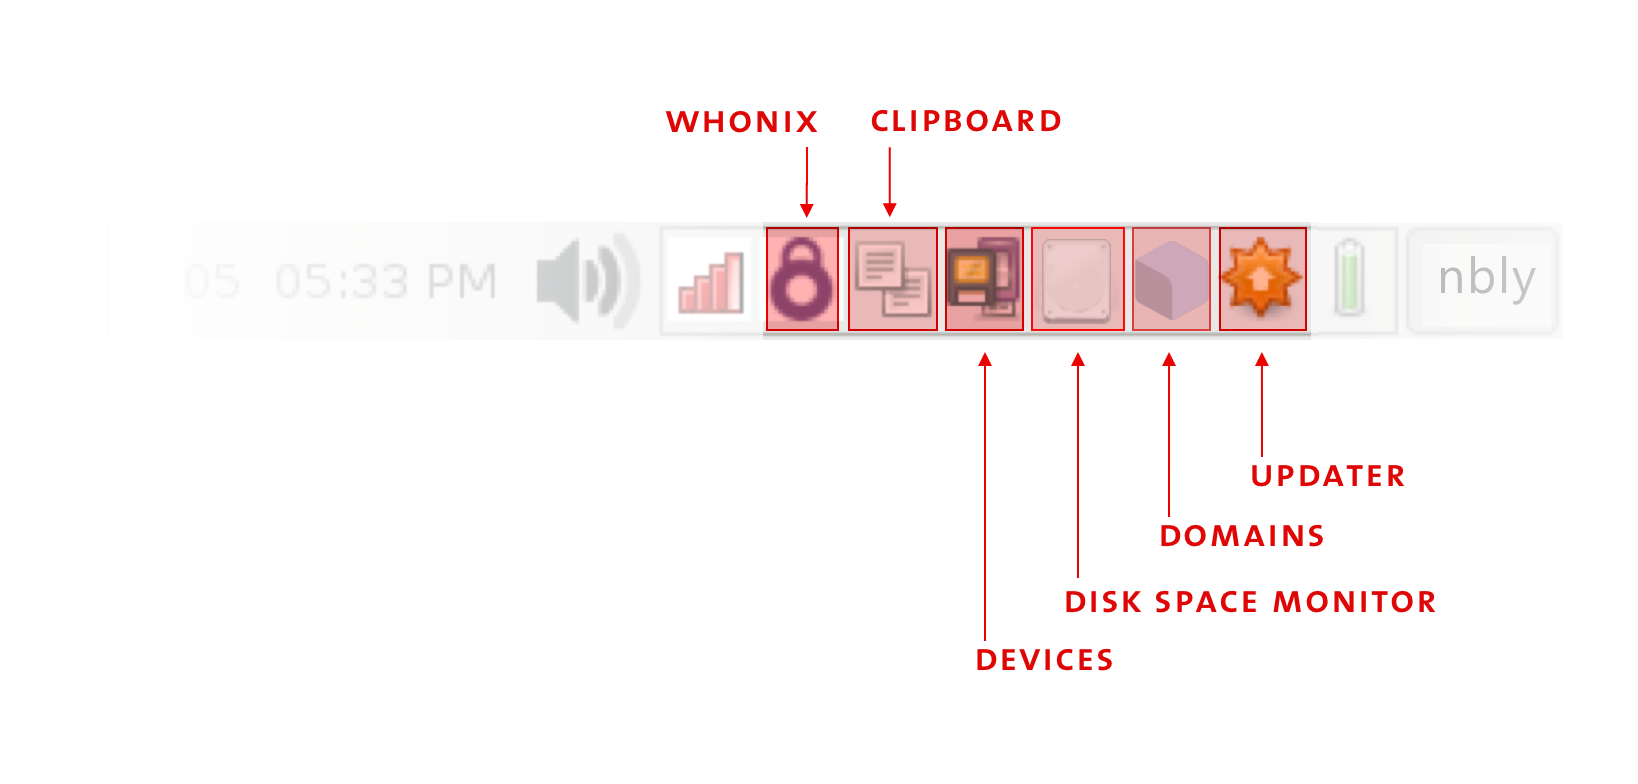
Click on the Domains widget to see which Qubes are currently running and how much memory (RAM) and processing power (CPU) they are using. Each qube uses memory, so when you are done with a qube, you should shut it down to free up the memory it is using. Closing windows isn't enough — you need to shut down the qube when you're done with it.
How to Install Software
While Tails can install additional software through a Graphical User Interface (GUI, the "point and click" alternative to the Command Line Interface), Qubes OS cannot at this time, so new software must be installed from the command line. If you are unfamiliar with the command line or how software works in Linux, see Linux Essentials to get acquainted. When choosing what additional software to install, keep in mind that being open-source is an essential criteria, but not sufficient to be considered secure. The list of included software for Tails will cover many of your needs with reputable choices.
Software is installed into Templates, which have network access only for their package manager (apt or dnf). Installing a package requires knowing its name, which can be found using a web browser for both Debian and Fedora, or using the command line.
It is best not to install additional software into the default Template, but rather to install the software into a cloned Template, to avoid unnecessarily increasing the attack surface of all App qubes based on the default Template. The basic formula is:
- Clone Template
- Install additional packages in the cloned Template
- Create an App qube based on the cloned Template
- Optional: Make this App qube a disposable
For example, to install packages for working with documents, which are not included by default in debian-12, clone it first. Go to Applications menu → Qubes Tools → Qube Manager. Right click on debian-12 and select "Clone qube". Name the new Template debian-12-documents.
To install new software, as described in the docs:
Start the template.
Start a terminal.
Install software as normally instructed inside that operating system, e.g.:
- Fedora:
sudo dnf install <PACKAGE_NAME>- Debian:
sudo apt install <PACKAGE_NAME>
Shut down the template.
Restart all qubes based on the template.
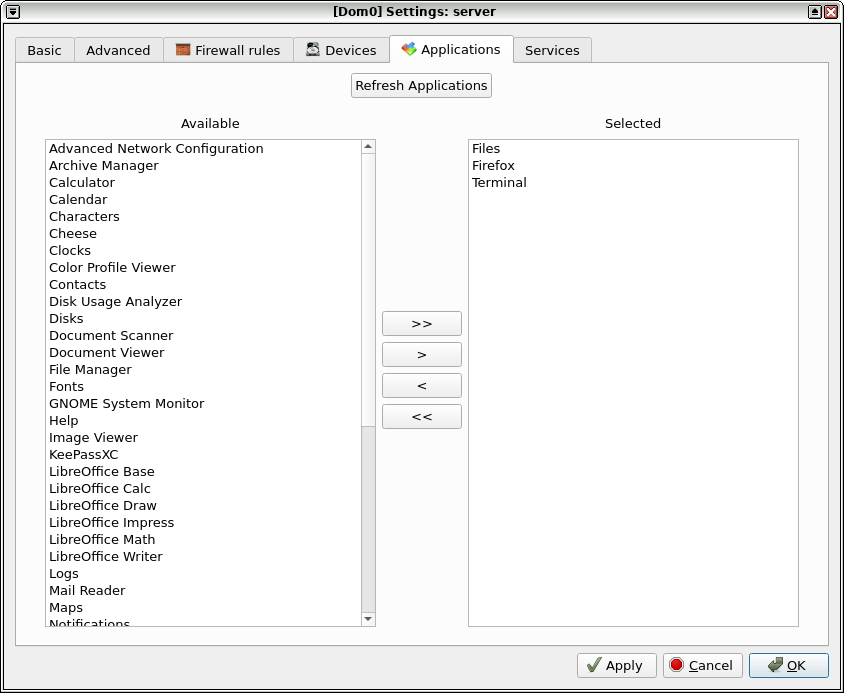
(Recommended) In the relevant qubes’ Settings → Applications tab, move the new application(s) to the "Selected" list, and press OK. These new shortcuts will appear in the Applications Menu. (If you encounter problems, see here for troubleshooting.)
Remember that you should not run apt update or dnf update.
Returning to the example above, I start a terminal in the debian-12-documents Template I just cloned, and then run sudo apt install libreoffice-writer mat2 bookletimposer gimp gocryptfs gnome-disk-utility. Once the installation was complete, I shut down the Template. I could then create or assign an App qube to use this Template, and it would now have LibreOffice, etc. Installing software should be the only time most users need to use the command line with Qubes OS.
You may want to use software that is not in the Debian/Fedora repositories, which makes things a bit more complicated and also poses a security risk — you must independently assess whether the source is trustworthy, rather than relying on Debian or Fedora. Linux software can be packaged in several ways: deb files (Debian), rpm files (Fedora), AppImages, Snaps and Flatpaks. A forum post outlines your options, and several examples are available in Encrypted Messaging for Anarchists. Basically, deb and rpm files are installed into Templates as you would expect, while AppImages, Snaps and Flatpaks are installed into App qubes.
If the software is available as a Flatpak on Flathub but not in the Debian/Fedora repositories, you can use Qube Apps — if the Flathub software is community maintained, this is a security consideration.
How to Organize Your Qubes
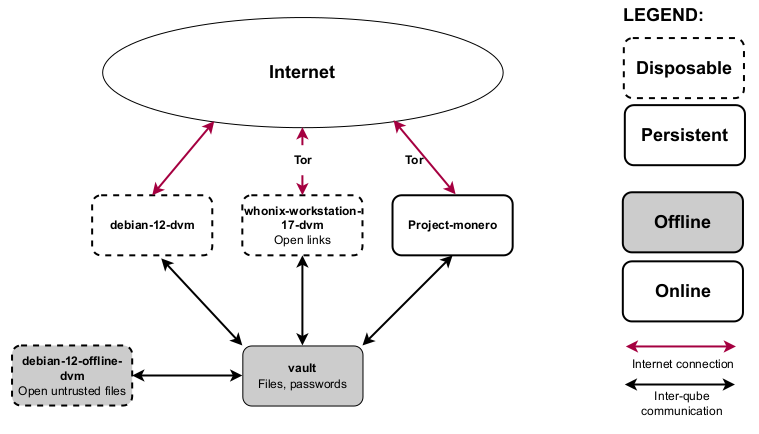
The next step is to decide how to organize your system — the options are much more flexible in Qubes OS than in a monolithic system like Tails (and more prone to user error). In general, you should try to use disposables to connect to the Internet whenever possible. Here is our recommended setup for the typical user, which can be tweaked as needed.
After installation, a number of qubes will already exist by default. Click on the Applications Menu to see them all. We are going to delete the following default App qubes because they connect to the Internet without being disposable: anon-whonix, work, personal, and untrusted. Go to Applications menu → Qubes Tools → Qube Manager. Right-click and select "Delete qube" for each.
This is how the App qubes will be organized, without displaying service qubes or Templates:
-
A vault qube. This is used for all data storage because you don't need internet to store files. This qube can be reassigned to the
debian-12-documentsTemplate so that trusted files can be opened there. -
A disposable Whonix-Workstation qube (
whonix-workstation-17-dvm).- Remember that Whonix works by using the Whonix-Workstation Template (
whonix-workstation-17) for the App qube, and the Whonix-Gateway Template (whonix-gateway-17) for a separate Service qube calledsys-whonix(not shown in this diagram). Unless you are an advanced user, you should never touch the Whonix-Gateway — all your activity takes place in an App qube using the Whonix-Workstation Template. When an App qube is disposable, the naming convention is to append-dvmfor disposable virtual machine. - Disposables appear in the Applications Menu in a way that can be confusing. You will see two entries for this qube: the whonix-workstation-17-dvm entry in the Apps menu, which is where you launch applications from, and the whonix-workstation-17-dvm entry in the Templates menu, which is the Template for the disposable (do not use applications from here).
- You can think of a disposable Whonix-Workstation qube as similar to Tails: system-wide Tor, and deletion after shutdown (without the anti-forensics property, as noted above).
- Do not customize the disposable Template at all to resist fingerprinting.
- Remember that Whonix works by using the Whonix-Workstation Template (
-
A disposable Debian or Fedora qube. The default
debian/fedora-dvmqube (depending on your post-installation decision) is disposable, and it is great for web browsing that blocks Tor, such as logging into online banking.
Creating Qubes
If you wanted, you could use the system as is, but let's create an App qube and a disposable so that you have more options.
An App qube for Monero
Say you want to use the Monero wallet for an anarchist project. We'll create a new qube to compartmentalize this activity.
Go to Applications menu → Qubes Tools → Create Qubes VM:
- Name: Project-monero
- Color: Yellow
- Type: AppVM
- Template: whonix-workstation-17
- Networking: sys-whonix
- Now that the qube exists, install the Monero wallet into the App qube, following the instructions for "Kicksecure-Qubes App qube".
- In the Settings → Applications tab, move Monero Wallet to the Selected column and press OK. The shortcut will now appear in the Applications Menu.
This App qube is not disposable. We prefer all networked qubes to be disposable, but this qube requires data persistence for the wallet to work, so it cannot be disposable with a simple setup.
Note that we don't need to clone the Template because the Monero wallet is a Flatpak, so it is installed into the App qube, not into the Template.
A disposable that is offline
At the moment, both disposables are networked (with and without Tor). To finish, we will demonstrate how to create a disposable without networking for opening untrusted files (like PDFs and LibreOffice documents).
The cloned Template we will need is already configured: debian-12-documents. Go to Applications menu → Qubes Tools → Create Qubes VM:
- Name: debian-12-offline-dvm
- Color: Black
- Type: AppVM
- Template: debian-12-documents
- Networking: none
- In the new qubes' Settings → Advanced tab, under "Other", check "Disposable Template", then press OK. You will now see the offline disposable in the Apps tab of the Applications Menu. Make sure you are not working in the disposable Template (the same name in the Templates tab of the Applications menu).
- Go to Applications menu → Qubes Tools → Qubes Global Settings. Set the default disposable Template to
debian-12-offline-dvm
Now, if a malicious document achieves code execution after being opened, it will be in an empty Qube that has no network and will be destroyed upon shutdown.
Additional Settings
By default, App qubes only have 2 GB of private storage. This small amount will fill up quickly — when an App qube is about to run out of space, the Disk Space Monitor widget will alert you. To increase the amount of private storage for any qube, go to the qubes' Settings → Basic tab and change the "Private storage max size". This storage won't be used immediately, it's just the maximum that can be used by that qube.
If a Disposable keeps crashing, try to increase the amount of RAM allocated to it: go to the disposable Template's Settings → Advanced tab and increase the "Initial memory" and "Max memory".
How to Use Disposables
Disposables can be launched from the Apps tab of the Applications menu. For example, to use a disposable Tor Browser, go to Application Menu: Apps tab → whonix-workstation-17-dvm → Tor Browser. This is how you do all your Tor browsing. Once you close all the windows of a disposable, the whole disposable is shut down and reset to the state of its Template — any malware that may have been installed is now gone.
In contrast, an App qube must be shut down manually (using the Qubes Domains widget), and will persist data in the /home, /usr/local, and /rw/config directory. The next time an App qube boots, all locations in its file system other than these three directories will reflect the state of its Template. See how inheritance and persistence works for Templates, App qubes, and disposables for more information.
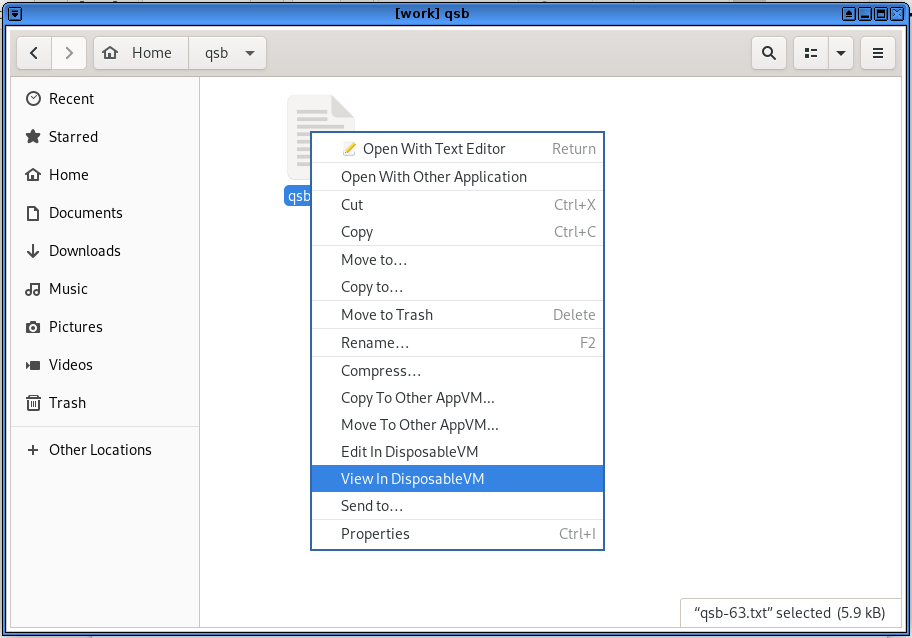
In the file manager of an App qube, right-clicking on certain file types gives you the Edit In DisposableVM and View In DisposableVM options. This is how we want to open any untrusted files. It will use the default disposable that we set earlier, which is offline. If you edit the file and save the changes, the changed file will be saved back to the original app qube, overwriting the original. In contrast, if you view the file, it opens in a disposable that is read-only — this way, if the file does something malicious it can't write to the App qube you launched it from. This is why it is preferable to only view files that you don't need to edit.
If your file opens in an application other than the one you want, you'll need to change the default for the disposable Template:
- Send a file of this type to your disposable Template (in our case,
debian-12-offline-dvm). - Open the file manager for the disposable Template.
- Select the file, right click and select Properties.
- In the Open With tab, select your preferred application for this file type.
- Press Set as default.
- Delete the file from the disposable Template (remember to empty the trash).
- Shut down the disposable Template for the change to take effect.
Sanitizing files
You can also use disposables to "sanitize" an untrusted file, which means making it trusted. It does this by converting it to images in a disposable and wiping the metadata. For PDF files, right-click and select Convert To Trusted PDF, and for image files, right-click and select Convert To Trusted Img. See the guide to open all file types in a disposable by default.
Whonix and Tor
The Whonix project has its own extensive documentation. So does Kicksecure, on which Whonix is based. When Whonix is used in Qubes OS, it is referred to as Qubes-Whonix. Whonix can be used on other operating systems, but it's preferable to use it on Qubes OS because of the superior isolation it provides.
Multiple default applications on a Whonix-Workstation App qube are configured to use unique circuits of the Tor network so that their activity cannot be correlated — this is called stream isolation.
To take advantage of compartmentalization, create separate Whonix-Workstation App qubes for distinct activities/identities, as we did above for the Project-monero qube. Distinct Whonix-Workstation App qubes are automatically stream isolated. Note that it is considered best practice not to use multiple Whonix-Workstation App qubes at the same time:
While multiple Whonix-Workstation are recommended, this is not an endorsement for using them simultaneously! It is safest to only use one Whonix-Workstation at a time and for a single activity. New risks are introduced by running multiple Whonix-Workstation at the same time. For instance, if a single Whonix-Workstation was compromised, it could potentially perform various side channel attacks to learn about running processes in other VMs, and not all of these can be defeated. Depending on user activities, a skilled adversary might be able to correlate multiple Whonix-Workstations to the same pseudonym.
Tor Browser won't be able to upload files from /home/user/QubesIncoming/ due to how permissions are set, so you'll need to move files to another location in /home/user/ to upload them, such as the Downloads directory.
Like any software, the Tor Browser has vulnerabilities that can be exploited — various police agencies have Tor Browser exploits for serious cases. To mitigate this, it's important to keep Whonix up to date, and you should increase the Tor Browser's security settings: click the shield icon, and then click Settings.... By default, it's set to Standard, which maintains a browsing experience comparable to a regular browser. We strongly recommend that you set it to the most restrictive setting before you start browsing: Safest. The vast majority of exploits against Tor Browser will not work with the Safest setting.
Occasionally, Tor Browser will notify you that a new version is available before it can be updated by using the Qubes Update tool. When this happens, you can run Tor Browser Downloader from the Whonix-Workstation Template (whonix-workstation-17). As noted in the docs, do not run this tool from a disposable Template — the disposable Template will be updated automatically.
Force All Network Traffic Through a VPN
When using the Internet from home, it is best to use a VPN for all network traffic — this puts your trust in your VPN instead of an inherently untrustworthy Internet Service Provider. As the Security Lab notes:
Using a reputable VPN provider can provide more privacy against surveillance from your ISP or government and prevent network injection attacks from those entities. A VPN will also make traffic correlation attacks — especially those targeting messaging apps — more difficult to perform and less effective.
There are two ways you can run a VPN: from your laptop or from your networking device (either a router or a hardware firewall). When using your laptop from home, we recommend the latter.
It's unnecessary to "double up" a VPN — if its running on your networking device, it doesn't need to be running on your laptop, and vice-versa. This means that a laptop running a VPN should disable it before connecting to an access point (whether Wi-Fi or ethernet) configured with a "VPN Kill Switch".
However, it's still valuable to know how to configure Qubes OS to force all network traffic through a VPN, for when you are using the laptop away from home. This involves creating a VPN qube. If you never use Qubes OS away from home, you can skip ahead to the next topic. Keep in mind that you'll want to revert these changes before connecting to your home's "VPN Kill Switch" access point.
Creating a VPN qube
For your VPN provider, we recommend either Mullvad or IVPN. A VPN subscription should be purchased anonymously — vouchers are available from Mullvad and IVPN to purchase the subscription anonymously without Monero.
To create a VPN qube, follow the guide for the Mullvad app or the the IVPN app. We'll assume that you named the new VPN qube sys-vpn. It will force all network traffic through the VPN before it reaches sys-firewall.
Configure non-Tor qubes that you will use
- For any disposables or App qubes you will be using while away from your home Wi-Fi, go to their Settings → Basic tab and change the net qube from
sys-firewalltosys-vpn. For example, make this change for debian-12-dvm. - To not forget to revert the change, do so before shutting down the laptop.
To understand this configuration, it may help to visualize the qubes involved in networking for debian-12-dvm:
| Qube name | Qube description | Net qube |
|---|---|---|
| sys-net | Your default network qube (pre-installed) | n/a |
| sys-firewall | Your default firewall qube (pre-installed) | sys-net |
sys-vpn | The VPN qube you created | sys-firewall |
| debian-12-dvm | Your disposable Debian qube | sys-vpn |
If you will use Whonix-Workstation, then configure sys-whonix
We recommend connecting to a VPN before connecting to Tor (i.e. You → VPN → Tor → Internet) when you are using an Internet connection tied to your identity.
- To configure connecting to a VPN before connecting to Tor, go to sys-whonix's Settings → Basic tab and change the net qube from
sys-firewalltosys-vpn. - To not forget to revert the change, do so before shutting down the laptop.
For more information on the rationale of this configuration, see Privacy Guides. Note that you should not connect to a VPN after Tor because this breaks Stream Isolation.
To understand this configuration, it may help to visualize the qubes involved in networking for whonix-workstation-17-dvm:
| Qube name | Qube description | Net qube |
|---|---|---|
| sys-net | Your default network qube (pre-installed) | n/a |
| sys-firewall | Your default firewall qube (pre-installed) | sys-net |
sys-vpn | The VPN qube you created | sys-firewall |
| sys-whonix | The Whonix-Gateway qube | sys-vpn |
| whonix-workstation-17-dvm | A disposable Whonix-Workstation qube | sys-whonix |
Connecting to a VPN ties you to any other computer activity you've used it for (via your subscription). You can think of it as equivalent to connecting to a trustworthy Internet Service Provider. If you are intentionally using an Internet connection not tied to your identity, such as Wi-Fi at a random cafe, leave sys-whonix's net qube set to sys-firewall (connect to Tor directly).
How to Use Devices (like USBs)
To learn how to attach devices, let's format the empty USB or hard drive that will be used for backups. Attaching the USB to an offline disposable mitigates against BadUSB attacks.
-
Go to Applications menu: Apps tab → debian-12-offline-dvm → Disks. The disposable will have a name with a random number such as disp4653. If Disks is not displayed in the menu, make the change in the Settings → Applications tab.
-
The Qubes Devices widget is used to attach a USB drive (or just its partitions) to any qube. Just click on the widget and plug in your USB drive (see the screenshot above). The new entry will be under "Data (Block) Devices", typically
sys-usb:sdais the one you want (sda1is a partition and would need to be mounted manually). Hover over the entry and attach it to the disposable you just started (in the case of the example above, disp4653). -
The empty USB or hard drive should now appear in the Disks application. Format the empty device, and then create a new encrypted partition as you would in Tails. You can use the same LUKS password that you use for your Qubes OS LUKS because it will need to be reliably memorized to restore a backup (i.e. you may lose access to your KeePassXC file in a scenario where you need your backups) and the USB will contain the same data as your Qubes OS drive.
-
Before removing the USB drive, first eject it using the Qubes Devices widget, which will eject it from the qube. Then go to Applications menu → sys-usb → Files and select "Safely Remove Drive" to eject it from the computer. After the USB is ejected, restart sys-usb to take advantage of it being disposable.
Cameras and microphones are considered devices and must be attached to an App qube to be used.
There are command line instructions for setting up an external keyboard or mouse — if you decide to use these, we recommend configuring a confirmation prompt, and storing both in a tamper-evident manner. We also recommend enabling a USB keyboard on a dedicated USB controller.
You don't always need to attach a USB drive to another qube with the Qubes Devices widget — external devices are also accessible directly from sys-usb, through the File Manager. You can copy specific files between the USB and another App qube without having to attach the USB controller to the App qube.
How to Backup
Once your qubes are organized the way you want them, you should back up your system. Depending on your needs, we recommend a weekly backup. We also recommend making a redundant backup that you store off-site and synchronize monthly (to protect against data loss in a house raid). You can simply have two backup USBs that you switch out at the off-site location (rather than bringing a backup USB home to update it monthly, which leaves you vulnerable to having no off-site backups during this time window).
Adapted from the docs:
Go to Applications menu → Qubes Tools → Backup Qubes.
Move the VMs that you want to back up to the right-hand Selected column. VMs in the left-hand Available column will not be backed up. You may choose whether to compress backups by checking or unchecking the Compress the backup box. Compressed backups will be smaller but take more time to create. We recommend selecting any App qubes with irreplaceable data, and documenting how you have configured your Templates, Service qubes and dom0 so that you don't need to back them up. Once you have selected all desired VMs, click Next.
Go to Applications menu: Apps tab → debian-12-offline-dvm → Files to start a file manager in an offline disposable. Plug in the LUKS USB or external drive you will be saving your backup to and attach it to the qube (see above for instructions on creating and attaching this drive). The drive should now be displayed at Other Locations in the file manager. Mount the LUKS partition by entering your password. Create a new directory in the LUKS partition called
backups.In Backup Qubes, select the destination for the backup:
- Target qube: select the disposable, named something like disp1217.
- Backup directory: click ... to select the newly created folder
backups.
- Enter an encryption passphrase, which can be the same as your Qubes OS user passphrase, because you will need to memorize it to restore from backup, and it will contain the same data. This is dom0, so you won't be able to paste it from a password manager.
- Untick "Save settings as default backup profile", and press Next.
- Once the backup is complete, test restore your backup. Go to Applications menu → Qubes Tools → Restore Backup. Do not forget to select Test restore to verify backup integrity (no data actually restored). A test restore is optional but strongly recommended. A backup is useless if you can’t restore your data from it. You can also verify that a backup is not silently corrupted by actually restoring it — first rename the App qube you will restore to avoid confusion.
Password Management
Manage passwords by using KeePassXC from the vault App qube. If you are not familiar with KeePassXC, you can learn about it in Tails for Anarchists. This approach requires you to memorize three passwords:
- LUKS password (first boot password)
- User password (second boot password, which is much less important than the LUKS password)
- KeePassXC password
Shutdown Qubes OS whenever you are away from the computer for more than a few minutes. For advice on password quality, see Tails Best Practices.
Windows Qubes
It is possible to have Windows qubes, although the installation is a bit involved. This allows programs not available for Linux, such as the Adobe Creative Suite programs, to be used from Qubes OS (ideally offline). Installing "cracked" software downloaded from a torrent is not recommended, as these files are often malicious. The Adobe Creative Suite can be downloaded from Adobe and then cracked using GenP.
Best Practices
Configuring Qubes OS is much more flexible than configuring Tails, but most of the Tails best practices still apply. To summarize, in the order of the Tails article:
Protecting your identity
- Clean metadata from files before you share them.
- Compartmentalization is baked into Qubes OS; instead of restarting Tails, use a dedicated qube.
Limitations of the Tor network
- For sensitive activities, don't use Internet connections that could deanonymize you, and prioritize .onion links when available. BusKill is also available for Qubes OS (and we recommend not obtaining it through the mail).
- If you might be a target for physical surveillance, consider doing surveillance detection and anti-surveillance before going to a cafe to use the Internet. Alternatively, use a Wi-Fi antenna from indoors. See the Tails article for further advice on deciding what Internet connection to use.
Reducing risks when using untrusted computers
- The verification stage of the Qubes OS installation is equivalent to the GnuPG verification of Tails.
- Only attach USBs and external drives to a qube that is disposable and offline.
- To mitigate physical attacks on the computer, buy a dedicated laptop from a refurbished store, make the laptop screws tamper-evident, and use tamper-evident storage.
- To mitigate remote attacks on the computer, you can use anonymous Wi-Fi. You can also replace the BIOS with HEADS, though this is advanced. Unlike for Tails, it's not possible to remove the hard drive because it is used by the operating system. Qubes OS already isolates the Bluetooth interface, camera, and microphone. USBs with secure firmware are less important thanks to the isolation provided by sys-usb, and a USB with a physical write-protect switch is unnecessary because the operating system files are stored on the hard drive.
Phishing awareness
- This is where Qubes OS really shines. Awareness is no longer your only defense — Qubes OS is designed to protect against phishing attacks.
- Open attachments in a disposable and offline qube.
- Open links in a disposable Whonix-Workstation qube.
Encryption
- Passwords: See above
- Encrypted containers: SiriKali works the same way, and is useful for a second layer of defense.
- Encrypted communication: Use Cwtch. See Encrypted Messaging for Anarchists. The Qubes OS documentation can be used to configure Split-GPG — this is an advanced configuration where private GPG keys are stored in an offline qube and access to them is strictly controlled.
Wrapping Up
The documentation has several troubleshooting entries, and the forum is generally very helpful. We recommend that you start using Qubes OS gradually, as trying to learn everything at once can be overwhelming. But we promise, it's not as complicated as it seems at first!
Appendix: Post-installation Decisions
During the post-installation of Qubes OS, you have the option to install only Debian or only Fedora Templates (instead of both). You also have the option to use the Debian Template for all sys qubes (the default is Fedora). Our recommendation is to install only Debian Templates and convert them to Kicksecure. This way, every App qube on your system will be either Whonix or Kicksecure — Kicksecure is significantly more hardened than either Debian or Fedora.
Kicksecure is not currently available as a Template. To get the Kicksecure Template, clone the Debian Template — follow the Kicksecure documentation for "distribution morphing" on Qubes OS. App qubes that require Internet access without Tor can now use the Kicksecure template instead of the Debian Template. We recommend using disposable qubes whenever possible when connecting to the Internet.
To create a Kicksecure disposable, go to Applications menu → Qubes Tools → Create Qubes VM:
- Name: kicksecure-17-dvm
- Color: purple
- Type: AppVM
- Template: kicksecure-17
- Networking: default (sys-firewall)
- In the new qubes' Settings → Advanced tab, under "Other", check "Disposable Template", then press OK. You will now see the disposable in the Apps tab of the Applications Menu. Make sure you are not working in the disposable Template (the same name in the Templates tab of the Applications menu).
Kicksecure is not officially supported for sys qubes. If you set all sys qubes to use the Debian Template during the Qubes OS installation, and set sys qubes to be disposable, the Template for sys-net, sys-firewall, and sys-usb will be debian-12-dvm. If you want to use disposable Kicksecure for sys qubes, set sys-net, sys-firewall, and sys-usb to use the kicksecure-17-dvm Template.
Appendix: Hardware Security
Hardware security is a nuanced subject, with three prominent factors at play for a Qubes OS computer:
-
Root of trust: A secure element for storing secrets that can be used as a root of trust during the boot process.
-
Blobs: Newer hardware comes with binary blobs that require trusting corporations to do the right thing, while some older hardware is available without binary blobs.
-
Microcode updates: Newer hardware gets microcode updates to the CPU that (ideally) fix vulnerabilities as they are discovered, while older hardware doesn't after it's considered end-of-life. The Heads threat model page explains why CPU vulnerabilities are important:
"With the disclosure of the Spectre and Meltdown vulnerabilities in January 2018, it became apparent that most processors manufactured since the late 1990s can potentially be compromised by attacks made possible because of transient execution CPU vulnerabilities. [...] Future not-yet-identified vulnerabilities of this kind is likely. For users of Qubes OS, this class of vulnerabilities can additionally compromise the enforced isolation of virtual machines, and it is prudent to take the risks associated with these vulnerabilities into account when deciding on a platform on which to run Heads and Qubes OS."
Of the community-recommended computers, the ThinkPad X230 and ThinkPad T430 strike a relatively unique balance because they both use the Ivy generation of CPUs and are both compatible with Heads:
- Root of trust: Heads uses the Trusted Platform Module (TPM) to store secrets during the boot process — the Thinkpad X230 and T430 have TPM v1.1.
- Blobs: There are no binary blobs on these models after Heads is installed, except for the Intel Management Engine (which can be neutered) and the Ethernet blob (which can be generated).
- Microcode updates: Spectre and Meltdown are mitigated by microcode updates for this generation of CPUs which are installed by default on Qubes OS. Some attacks target only newer CPUs (new CPU extensions mean new attack surface), and the Ivy generation CPUs won't be vulnerable to these attacks.
Qubes OS also applies appropriate software mitigation to this class of attacks at the hypervisor level, including disabling HyperThreading.
Appendix: OPSEC for Memory Use
Each running qube uses memory, and a compromised qube could use CPU vulnerabilities to read and exfiltrate memory used by other qubes. To address "future not-yet-identified vulnerabilities of this kind", the operational security (OPSEC) suggestion is to limit the presence of things in memory that a compromised qube could read.
Disposables are recycled after they are shut down, so we can assume that their compromise would likely be temporary (for it to not be temporary, an adversary would need to escape from the virtual machine with a Xen exploit, before the disposable is shut down). Memory OPSEC protects against an adversary who can exploit a CPU vulnerability, but cannot escape from a Xen virtual machine.
We call a qube "untrusted" when it is networked and thus is at a higher risk of compromise. While it can be useful to distinguish levels of trust for networked qubes based on likely attack vectors (red borders for fully untrusted, purple borders for semi-trusted, etc.), any networked qube should be considered untrusted on some level. Whenever possible, untrusted qubes should be disposable.
Principles
Make sure to always be aware of which qubes are running simultaneously.
- Perform sensitive operations in trusted qubes (without networking if not required), while no untrusted qubes are running. Shut down trusted qubes when they are not in use. The
vaultis considered a trusted qube. - While untrusted qubes are running there should be no qubes running simultaneously that put sensitive data into memory, because you are assuming that all memory could be leaked. Qubes containing sensitive data include:
- Any qubes containing data that isn't compartmentalized to your current activity. For example, if you are moderating a website, images files you are going to upload to the website aren't sensitive, but files associated with an unrelated project are.
- The
vaultqube containing your KeePassXC database. - If your untrusted qube requires access to SSH or PGP private keys, set up split-GPG or split-SSH. Use split-GPG or split-SSH from untrusted qubes that you have freshly started (and that are therefore less likely to have been compromised) rather than from untrusted qubes that you've already been using for hours.
Sys qubes
- sys-usb: Set as disposable during the post-installation. Run only when needed, and shut down when finished. Restart after using an untrusted USB device.
- sys-net: Set as disposable during the post-installation. Run only when needed, and shut down when finished. Shut down when performing sensitive operations in other qubes, if possible. Restart before compartmentalized activities that require high security.
If you need a password from KeePassXC
While using an untrusted qube, you may need to have access to a password. We'll use the "Emergency pause" feature to neutralize the untrusted qube while opening the vault for the password. For instance, using the untrusted disposable qube whonix-workstation-17-dvm:
- Using the Domains widget, "Emergency pause" all untrusted qubes that are running.
- Start
vault. Open KeePassXC and copy the required password to the global clipboard. - Shutdown
vault - Unpause the untrusted qube(s). You can now paste the password from the global clipboard.
If you need a file from the vault
While using an untrusted qube, you may need to copy a file from the vault. To avoid having the vault and untrusted qube running simultaneously, we'll use an intermediary offline disposable. For instance, using the untrusted disposable qube whonix-workstation-17-dvm:
- Using the Domains widget, "Emergency pause" all untrusted qubes that are running.
- Start
vaultand your offline disposable,debian-12-offline-dvm(let's say it opensdisp1312). Copy the file from thevaulttodisp1312. - Shutdown
vault - Unpause the untrusted qube(s). You can now copy the file to it from
disp1312.
Alternatively, you can create a vault qube for file storage that is compartmentalized to the activity (vault-webmoderation). Such a vault can run simultaneously to untrusted qubes used for that activity. Keep your KeePassXC database in vault.
If you need to save a file to the vault
You may also need to copy a file to the vault, so that it can be saved after the disposable is closed. Using the untrusted disposable qube whonix-workstation-17-dvm:
- Start
debian-12-offline-dvm(let's say it opensdisp1312). - Copy the file to
disp1312from the untrusted qube. - When you are done using the untrusted qube, shut it down.
- Start
vault. Copy the file fromdisp1312to thevault. Sanitize it before opening.
Alternatively, you can create a vault qube for file storage that is compartmentalized to the activity (vault-webmoderation). Such a vault can run simultaneously to untrusted qubes used for that activity. Keep your KeePassXC database in vault.
Categories:
 Defensive
Tags:
 intro
linux
windows
qubes
intermediate
intro
linux
windows
qubes
intermediate